Blog map

Thursday, 22 November 2012

How to Upgrade your Computer to Windows 8


Windows 8 is finally here. I just upgraded my Windows 7 desktop to Windows 8 and the process couldn’t be smoother.
All the existing software programs work just fine in Windows 8 and the built-in Windows Store offers a plethora of new full-screen “apps” to choose from. Desktop search is so much better in Windows 8, the UI feels more snappy and the system will boot faster. You don’t need to install a separate anti-virus program as Windows Defender is already included in Windows 8.
If you haven’t played with the Windows 8 beta versions earlier, it may take a day or two to get comfortable with the new layout but overall, Windows 8 is a must-have upgrade.
Windows 8

Upgrading to Windows 8 – Step by Step

If you are also planning to make the switch to Windows 8 this weekend, here are 3 things you would need:
  • A Windows machine running Windows 7, Vista and Windows XP. It doesn’t matter if you have computer is running Windows XP Premium or Windows 7 Home Basic.
  • A valid credit card or a PayPal account to pay the upgrade fee – you will be required to pay $39.99 for the Windows 8 Professional edition.
  • An internet connection for downloading the Windows 8 installer (2.05 GB). You may also order the Windows 8 installer on a DVD though it may not be necessary as it is quite easy to create your own Windows 8 DVD.
Please note that you are opting for an “upgrade” so it will overwrite your existing copy of Windows and there’s no way you can uninstall Windows 8 to switch to the previous Windows installation.
Also, your existing software programs will only be preserved if you are moving from Windows 7 to Windows 8. If your current PC is running Windows XP or Vista, all your files and data will be preserved but you will have to reinstall the software apps after upgrading to Windows 8.
Ready? Here’s how may upgrade your computer to Windows 8.
First download and run the Upgrade Assistant program. This will essentially perform a few checks on your computer and will also suggest a list of software programs / hardware devices that may not be compatible with Windows 8.
Windows 8 Compatibility Report
Next you need to order your Windows 8 upgrade pack right inside the installation wizard. Choose the “Checkout” option, enter your Credit Card details and the next screen will show your Windows 8 product key that you may need at the time of installation. You don’t have to write then down on paper and Microsoft will also send a receipt of your order and the Windows serial number to your email address.
Important: What you are buying is the upgrade license that will only work on an existing Windows machine. You cannot use this Windows 8 license on a new machine that you could be building from scratch. If you wish to install Windows 8 from scratch on a new hard disk, you need the System Builder that may not be available at all locations.
Order Windows 8 Upgrade
The upgrade assistant will now download the Windows 8 installer files to your computer. This process may take a while since it will require the transfer of ~2 GB of data from Microsoft servers to your disk.
Tip: The Windows 8 installer files are stored in the C:\ESD\Windows\Sources folder – it’s hidden so you may not find it inside Windows Explorer.
Downloading Windows 8
Once the installer files have been downloaded, you can continue with the installation or you may pick the second option that says – “Install by creating media.”  Here you can save the Windows 8 installer files in a single ISO file and then, from the wizard itself, burn the ISO image into a bootable DVD. This may come handy later when you want to repair or reinstall Windows 8 later but have deleted the installer from the disk to free up disk space.
Windows 8 Installation Options
Once the DVD is ready, double-click the Windows Setup shortcut (you’ll find it on your desktop) to run the setup again.
You can either do a clean install and choose “Nothing” or use the “Windows settings, personal files and apps” option to preserve your files as well as programs (recommended).  Also, if you choose “Nothing,” your personal files (anything saved inside the User folder and on the desktop) will be moved to a windows.old folder.
Choose the first “Install Now” option and Windows 8 will finish installing itself. Simple!
How to fix Windows XP Font Problems

If the default XP font size is suddenly looking too large and bold or if the push buttons span out of the dialog box window, you probably deleted a default Windows System Font. 

Don't panic - the missing Windows XP Fonts (.fon, .ttf) can be quickly restored to default in few simple steps.

How to restore missing fonts in Windows XP

Approach 1
Perform a repair installation (upgrade) of Windows XP. All existing restore points are removed and a new system checkpoint restore point is created after the in-place upgrade is completed. You need the original Windows XP CD with XP Product key.

Windows Setup will replace any missing, damaged or corrupted font files that is part of Standard Fonts included with Windows XP 

• Courier New (TrueType, including Bold, Italic, and Bold Italic variations)
• Arial (TrueType, including Bold, Italic, and Bold Italic variations)
• Times New Roman (TrueType, including Bold, Italic, and Bold Italic variations)
• Wingdings, Symbol (TrueType)
• MS Serif, MS Sans Serif

Approach 2
Reinstalling Windows XP is a time consuming process and may even overwrite some of your custom settings. Here's an easy way. 

The following is a list of Fonts (with filenames) that installed by Windows XP. Compare this list with the files in your Windows System fonts folder. If any files is missing, here's how to install it locally from Windows XP installation CD.


Open Command Prompt and go to the i386 folder of your Windows XP CD-ROM. Using the "expand -r" command, copy all the missing .tt_ and .fo_ files to Windows folder.

for .FON font files
expand E:\i386\Sserife.fo_ C:\Windows\Fonts\Sserife.fon

for ".TTF" font files:
expand E:\i386\Arial.tt_ C:\Windows\Fonts\Arial.ttf

Replace C:\Windows\Fonts with %windir%\fonts

Approach 3
Reset the windows default font size to 75%, then back to 100%. Restart the system. Here's how to do the right way.


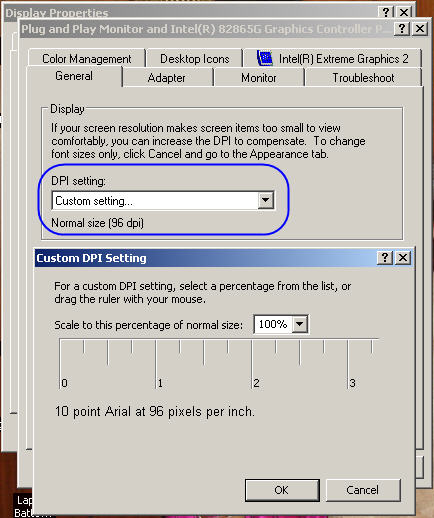
Open Display in Control Panel. On the Settings tab, click Advanced. On the General tab, in the DPI setting list, click the dots per inch (dpi) setting you want to use. 

If you choose Other in the DPI setting list, you can set custom options in the Custom DPI Setting dialog box either by selecting one of the percentage options in the drop-down list or by clicking on the ruler and dragging the pointer to specify a setting. Restart your computer when prompted. 

Precautions for handling fonts.

1. Always create a System Restore point before handling Fonts. Incase you delete a wrong font or mess up the Windows Fonts folder, System Restore tool will return your computer to a previous working state.

2. Compare and Delete Fonts with Font Managers, Font Viewers
Removing fonts manually is not recommended as you may end up deleting the important required fonts. Try using a professional Font Management software like Extensis Suitcase Fusion, Adobe Type Manager or Bitstream Font Navigator (part of CorelDRAW X3) for handling Normal, TrueType, OpenType and PostScript fonts.

How will Windows find replacment fonts ?
The Font Substitute settings are stored in the following registry key: 

HKLM/software/Microsoft/WindowsNT/CurrentVersion/FontSubstitutes/

Though, Windows has the ability to find font replacements when a specific font isn't installed, imagine what happens when even the Substitute font is missing. You will then need the original font file.

Reinstalled Windows XP but see Large fonts on screen
See the screenshot. Change the DPI settings by some amount and click apply. Now switch to the original settings and click OK.

When should I delete Windows Fonts ?
If you system has less RAM but millions of fonts, it's time to remove those rarely used "fancy decorative fonts" installed by that Greeting Cards software.

How can I change the size of default XP font? 
First save your desktop theme to it becomes easy restore the original "behavior" of Windows XP.
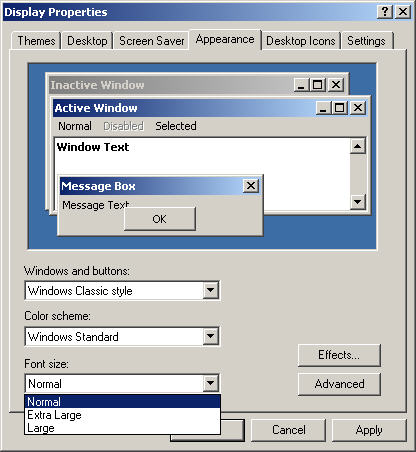
Open Display in Control Panel. On the Appearance tab, in Font size, click a new font size. This option enables you to enlarge the fonts used in window headers, icon labels, and menus.


To change the actual font, try changing your default system font to something better in registry.

HKEY_LOCAL_MACHINE\Software\Microsoft\Windows NT\CurrentVersion\FontSubstitutes

The defaults are MS Shell Dlg and MS Shell Dlg 2. Download Windows XP fonts at Adobe Type Center.

Additional Notes on "@" fonts
The fonts appearing in your "fonts" folder beginning with the "@" symbol can not be deleted individually. They are part of a TrueType Collection (TTC) of fonts. TTC files are mostly used to group Oriental language fonts which share some characters. They are copied to your fonts folder with Windows 2k and Windows XP, but are not activated unless you activate International Language support for Windows. You cannot delete the individual fonts.